

iSCSI是internet Small Computer System Interface的缩写,又称为IP-SAN,是一种基于因特网及SCSI-3协议下的存储技术,由IETF提出,并于2003年2月11日成为正式的标准。
iSCSI的目的是为了用IP协议将存储设备连接在一起。通过在IP网上传送SCSI命令和数据,iSCSI推动了数据在网络之间的传递,同时也促进了数据的远距离管理。由于其出色的数据传输能力,iSCSI协议被认为是促进存储区域网(SAN)市场快速发展的关键因素之一。因为IP网络的广泛应用,iSCSI能够在LAN、WAN甚至Internet上进行数据传送,使得数据的存储不再受地域的现在。iSCSI技术的核心是在TCP/IP网络上传输SCSI协议,即使用TCP/IP报文和iSCSI报文封装SCSI报文,使得SCSI命令和数据可以在普通以太网络上进行传输,如下图所示。

iSCSI的工作过程:当iSCSI主机应用程序发出数据读写请求后,操作系统会生成一个相应的SCSI命令,该SCSI命令在iSCSI initiator层被封装成ISCSI消息包并通过TCP/IP传送到设备侧,设备侧的iSCSI target层会解开iSCSI消息包,得到SCSI命令的内容,然后传送给SCSI设备执行;设备执行SCSI命令后的响应,在经过设备侧iSCSI target层时被封装成ISCSI响应PDU,通过TCP/IP网络传送给主机的ISCSI initiator层,iSCSI initiator会从ISCSI响应PDU里解析出SCSI响应并传送给操作系统,操作系统再响应给应用程序。
iet(iSCSI Enterprise Target)是Linux下的iSCSI Target实现,open-iscsi是Linux下的iscsi initiator实现,使用iet(官方网站:http://iscsitarget.sourceforge.net)和open-iscsi就可以方便的实现简单的IPSAN,同时iet也可以和其他系统的iscsi initiator配合使用。
一、iet安装
1、下载iet。
srv10:~# wget http://sourceforge.net/projects/iscsitarget/files/iscsitarget/1.4.20.2/iscsitarget-1.4.20.2.tar.gz/download
3、 使用如下命令解压并编译安装iet。
srv10:~#tar -xzvf iscsitarget-1.4.20.2.tar.gz
srv10:~#cd iscsitarget-1.4.20.2
srv10:~#make && make install
二、iet基本配置
iet主要包括以下配置文件(控制文件的优先级类似与tcp_wrappers)。
/etc/iet/ietd.conf :iet的主配置文件
/etc/iet/initiators.allow:控制initiator对target的访问权限。
/etc/iet/initiators.deny:控制initiator对target的访问权限。
/etc/iet/targets.allow:控制不同target的被访问权限。
通过iet实现iSCSI Target的基本功能需要完成以下二个配置
iSCSI Target的命名,命名在同一子网内应该是唯一。在/etc/iet/ietd.conf文件中增加如下内容实现iSCSI Target命名。
Target target名称
其中:
target 名称:是iSCSI Target名称。一般iSCSI Target命名采用“iqn.yyyy-mm.
将块设备、文件、LVM卷、RAID卷作为块设备映射给iSCSI initiator使用。在/etc/iet/ietd.conf文件中增加如下内容实现块设备映射。
Lun
其中:
Path=
Type=fileio|blockio:指定块设备类型,分区及dd命令生成的文件使用fileio类型;LVM卷、RAID卷使用blockio类型。
IOMode=(wb|ro):指定iSCSI initiator允许的操作,wb表示可读写;ro表示只读。
将如下内容加入/etc/iet/ietd.conf文件后,通过重新启动计算机再运行/etc/init.d/iscsi-target restart命令(不知什么原因,修改/etc/iet/ietd.conf文件后必须重新启动计算机)启动iet后iSCSI initiator即可使用。
Target iqn.2011-02.zqin.example:storage.lun0
Lun 0 Path=/dev/sdb1,Type=fileio
Alias lun0
三、iet其它配置
使用命令方式配置iSCSI Target
通过命令方式配置的iSCSI Target在重启后会失效。
1、 添加一个新的Target。其中[id]为数字必须是唯一的,后面的Name需要自定义,也需要保证是唯一的。
srv10:~#ietadm --op new --tid=[id] --params Name=iqn.zqin.example
2、 添加一个新的 lun。其中[id] 必须是一个已经存在的 tid 号, [lun] 从0开始。
srv10:~#ietadm --op new --tid=[id] --lun=[lun] --params Path=/path/exported/file,Type=fileio
四、iet常用命令
1、 查看当前iSCSI Target清单。
srv10:~#cat /proc/net/iet/volume
2、 查看当前服务器iSCSI Target服务以及连接状态命令
srv10:~#cat /proc/net/iet/sessions
3、 停止某个Target 的某个 Connection 的连接。
srv10:~#ietadm --op delete --tid=2 --sid=562950876233792 --cid=1 && ietadm --op delete --tid=2
4、 停止所有Target 的连接。
srv10:~#ietadm --op delete
5、 删除某个Target (已经没有 Session 连接的)。
srv10:~#ietadm --op delete --tid= 1
五、iSCSI initiator配置
(一)Linux客户端
1、 使用如下命令安装Open iSCSI/iscsi-initiator-utils-6.2.0.872-6.el5.i386。
srv10:~# apt-get install open-iscsi
or
srv10:~# yum install iscsi-initiator-utils*
包含(iscsiadm iscsid iscsi-iname iscsistart )
2、 查找(discovery)指定IP下的Target。
srv10:~#iscsiadm -m discovery -t st -p 192.168.159.74
3、 执行以下命令登陆iSCSI Target。
srv10:~#iscsiadm -m node -T iqn.2011-02.zqin.example:storage.lun0 -l
(二)Windows客户端
目前微软最新的服务器端操作系统Windows Server 2008已经支持iSCSI群集(Windows Vista/7也支持iSCSI),这样好处是不言而喻,相比昂贵的SAN而言iSCSI更加的廉价,性能也可以接受。对于预算紧张又希望应用高可用的用户来说是个很好的选择。在Windows 7中连接到一个iSCSITarget操作步骤如下。
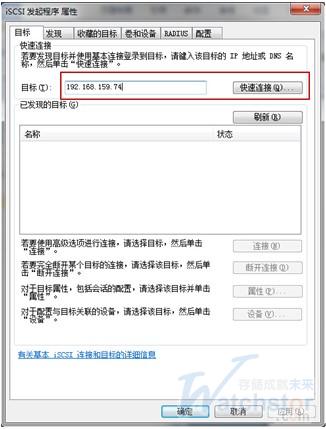
1、 打开“管理工具”→“iSCSI 发起程序”。
2、 打开“目标”选项页后,在“目标”中输入iSCSI Target所在主机的IP地址,单击“快速连接”。
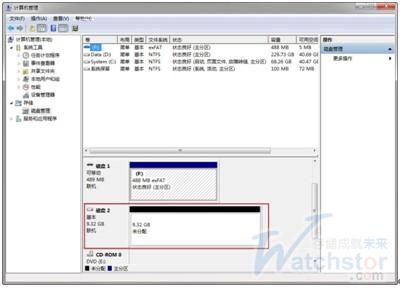
3、 在计算机磁盘管理器中会出现一上新的硬盘就是iSCSI Target。格式化后即可像本机物理磁盘一样使用。
查看当前虚拟单元清单。
cat /proc/net/iet/volume
查看当前服务器 ISCSI target 服务以及连接状态命令
cat /proc/net/iet/sessions
关于ISCSI Target 的配置,常用有两种方式:
1.修改配置文件
vi /etc/ietd.conf
2.使用IET管理命令行
添加一个新的 target
ietadm --op new --tid=[id] --params Name=iqn.foo.bar:baz
其中[id] 为数字,必须是没有使用过的。后面的Name 需要自己自定义,也需要保证是唯一的。
当然不知道自己本机所有target id 的话,可以使用这个命令查看当前的target 状态和得到target id.
查看当前服务器 ISCSI target 服务以及连接状态命令
cat /proc/net/iet/sessions
添加一个新的 lun
Note:在一个已经存在的 target 上加入一个lun,以便共享出来给外界。
ietadm --op new --tid=[id] --lun=[lun] --params Path=/path/to/exported/file,Type=fileio
[id] 必须是一个已经存在的tid 号,[lun]可以自己定义。
后面的path 我就不需要多说了,就是共享的路径了。
关于ietadm 其余的命令,大家可以使用 ietadm --help 来查看更多的指令。
所有的配置更改过后,大家别忘重启iscsi 服务。
service iscsi-target restart
强力推荐一个非常好的介绍配置的网站:
http://www.linuxtopia.org/online_books/suse_linux_guides/SLES10/suse_enterprise_linux_server_installation_admin/sec_inst_system_iscsi_target.html
其他常见问题
1.防火墙链接限制,外界无法访问Target 服务器3260 端口。
请在防火墙上手动放开 3260 端口,或者有条件的话干脆关闭防火墙。
更改防火墙配置并重启生效
vi /etc/sysconfig/iptables
server iptable restart
2.共享的路径都可以有哪些?
在IET 的技术文档中规定,以下几种路径是被支持的:

1)一个完整的block 磁盘,比如我在前文中所述的 /dev/sdb。
2)一个RAID 设备或者是一个 LVM ,这个我没测试过!-_-!
3)一个虚拟的镜像文件,可能性能可比直接IO 读取稍差点!
例子:
制作一个512M 的磁盘镜像
dd if=/dev/zero of=/disk.img bs=512 count=1000000
IET 配置中lun 设置:
LUN 0 Path=/disk.img,Type=fileio
重启IET服务生效!
[root@localhost iet]# ietadm --help
Usage: ietadm [OPTION]
iSCSI Enterprise Target Administration Utility.
--op new --tid=[id] --params Name=[name]
add a new target with [id]. [id] must not be zero.
--op delete --tid=[id]
delete specific target with [id]. The target must
have no active sessions.
--op show --tid=[id]
show target parameters of target with [id].
--op show --tid=[id] --sid=[sid]
show iSCSI parameters in effect for session [sid]. If
[sid] is "0" (zero), the configured parameters
will be displayed.
--op show --tid=[id] --user
show list of Discovery (--tid omitted / id=0 (zero))
or target CHAP accounts.
--op show --tid=[id] --user --params=[user]=[name]
show CHAP account information. [user] can be
"IncomingUser" or "OutgoingUser". If --tid is
omitted / id=0 (zero), [user] is treated as Discovery
user.
--op new --tid=[id] --lun=[lun] --params Path=[path]
add a new logical unit with [lun] to specific
target with [id]. The logical unit is offered
to the initiators. [path] must be block device files
(including LVM and RAID devices) or regular files.
--op delete --tid=[id] --lun=[lun]
delete specific logical unit with [lun] that
the target with [id] has.
--op delete --tid=[id] --sid=[sid] --cid=[cid]
delete specific connection with [cid] in a session
with [sid] that the target with [id] has.
If the session has no connections after
the operation, the session will be deleted
automatically.
--op delete stop all activity.
--op update --tid=[id] --params=key1=value1,key2=value2,...
change iSCSI IET target parameters of specific
target with [id]. You can use parameters in ietd.conf
as a key.
--op new --tid=[id] --user --params=[user]=[name],Password=[pass]
add a new account with [pass] for specific target.
[user] could be or [OutgoingUser].
If you don't specify a target (omit --tid option),
you add a new account for discovery sessions.
--op delete --tid=[id] --user --params=[user]=[name]
delete specific account having [name] of specific
target. [user] could be or
[OutgoingUser].
If you don't specify a target (omit --tid option),
you delete the account for discovery sessions.
--op update --tid=[id] --redirect=[dest]
redirect login to target with tid [id] to portal
[dest]. Discovery sessions will not be impacted,
but normal sessions will be redirected before
security negotiation. The destination should be
specified using the format:
IPv6 addresses need to be enclosed in [] brackets
To clear, provide an empty string
--version display version and exit
--help display this help and exit
Report bugs to
软件版本:iscsitarget-1.4.20.2.tar.gz
安装软件:
服务器端:
yum install likernel-headers kernel-devel make gcc gcc-c++ flex patch
[root@localhost ~]# tar zxvf iscsitarget-1.4.20.2.tar.gz
[root@localhost ~]# cd iscsitarget-1.4.20.2
[root@localhost iscsitarget-1.4.20.2]# make
[root@localhost iscsitarget-1.4.20.2]# make install
安装完成,开始配置
Iscsitarget安装完毕后,会创建/etc/iet/目录,此目录下有Iscsitarget的相关配置文件
[root@localhost iscsitarget-1.4.20.2]# cd /etc/iet/
[root@localhost iet]# vi ietd.conf
打开ietd.conf文件,首先找到类似如下行:
#Target iqn.2001-04.com.example:storage.disk2.sys1.xyz
此选项表示该iSCSI Target的命名,先将前面的“#”号去掉, Target的命名在同一子网内应该是唯一的,标准命名方式为:
iqn.yyyy-mm.[:identifier]
其中:
iqn:表示“iSCSI Qualified Name”,简称iqn。
yyyy-mm:表示年份-月份。这里是2001-04。
reversed domain name:表示倒过来的域名,这里是com.example。
identifier:表示识别代码,这里是storage.disk2.sys1.xyz。
接下来,就是要设定 LUN(Logical Unit Number),找到类似如下行:
#Lun 0 Path=/dev/sdb,Type=fileio,ScsiId=xyz,ScsiSN=xyz
将前面的“#”号去掉,“Lun 0 Path=/dev/sdb”表示块设备号为0,映射的磁盘为/dev/sdb,
“Type”值fileio是默认的,表示设置设备IO传输类型,有fileio、blockio、nullio。逻辑卷推荐用fileio,分区推荐用blockio。
主要用来对一个磁盘进行存储共享。读者可以根据自己情况将Path改为需要共享的存储分区的设备标识。
这里我们新建一个分区来作为iscsitarget存储的分区
[root@localhost iet]# fdisk /dev/sda
新分区一个分区叫/dev/sda4 大小为512M。
格式化分区
[root@localhost ~]# mkfs.ext4 /dev/sda4
在这里我们的ietd.conf的配置文件为:
Target iqn.2012-07.com.example:yan
Lun 0 Path=/dev/sda4,Type=blockio,ScsiId=xyz,ScsiSN=xyz
接下来就可以启动服务了
[root@localhost ~]# service iscsi-target start
[root@localhost ~]# /etc/init.d/iscsi-target start
Starting iSCSI Target: FATAL: Error inserting crc32c_intel (/lib/modules/2.6.32-279.2.1.el6.x86_64/kernel/arch/x86/crypto/crc32c-intel.ko): No such device
FATAL: Module iscsi_trgt not found.
[确定]
首先解决第二个错误
FATAL: Module iscsi_trgt not found.
解决办法:
mkdir /lib/modules/`uname -r`/kernel/iscsi
find / -name “iscsi_trgt.ko”
cp iscsi_trgt.ko /lib/modules/`uname -r`/kernel/iscsi
把iscsi_trgt.ko模块复制到正确的位置
depmod -aq
重建一下内核模块的依赖关系
这个时候再启动服务的时候
[root@localhost ~]# /etc/init.d/iscsi-target start
Starting iSCSI Target: FATAL: Error inserting crc32c_intel (/lib/modules/2.6.32-279.2.1.el6.x86_64/kernel/arch/x86/crypto/crc32c-intel.ko): No such device
还是会报一个错,但是我们查看服务的时候,发现iscsiatrget服务已经正常启动了
查看软件是否启动:
[root@localhost ~]# netstat -antup | grep 3260
Active Internet connections (only servers)
Proto Recv-Q Send-Q Local Address Foreign Address State PID/Program name
tcp 0 0 0.0.0.0:53350 0.0.0.0:* LISTEN 1198/rpc.statd
tcp 0 0 0.0.0.0:111 0.0.0.0:* LISTEN 1180/rpcbind
tcp 0 0 0.0.0.0:3260 0.0.0.0:* LISTEN 1738/ietd
tcp 0 0 :::22 :::* LISTEN 1407/sshd
tcp 0 0 :::3260 :::* LISTEN 1738/ietd
可以看出ietd服务已经正常启动了,但是为什么启动的时候会报
Starting iSCSI Target: FATAL: Error inserting crc32c_intel (/lib/modules/2.6.32-279.2.1.el6.x86_64/kernel/arch/x86/crypto/crc32c-intel.ko): No such device
各种google,终于找到了原因,链接地址:http://old.nabble.com/FATAL%3A-Error-inserting-crc32c_intel-td33228335.html
因为现在我用的是centos6.3,内核版本为2.6.32-279.2.1.el6.x86_64

 哲涛科技
哲涛科技